
Part 3: What’s in a tech pack and why
Flat sketches (and how to stop your store from looking like an outlet mall)
This is part 3 in our blog series on tech packs. Over the last two weeks we talked about the small but mighty cover page and the sampling page and BOM.
This week we’re talking about flat sketches.
Sending flat sketches of your unique design is the best way to communicate exactly what you want your garment to look like, and make sure it stays consistent from order to order.
Using sketches rather than sending your factory a competitor sample and asking for some changes makes proto development easier for you and for your factory.
In today’s post I’ll walk through the sketches I include in a tech pack.
Then I’ll tell you the story of how including these sketches can stop your store from looking like an outlet mall.
At the end, if you want to take a closer look at the sketches I’ve included below, you can grab the tech pack* with the flat sketches you see here for free.
*I never share client work. This is a personal project.
Let’s get started:

A basic flat sketch
The first page I include in any tech pack is a basic clean flat sketch. This shows the factory your style from a few different angles without any text cluttering the page. This is a great way to introduce the design before getting into more detail.
Main detail sketch
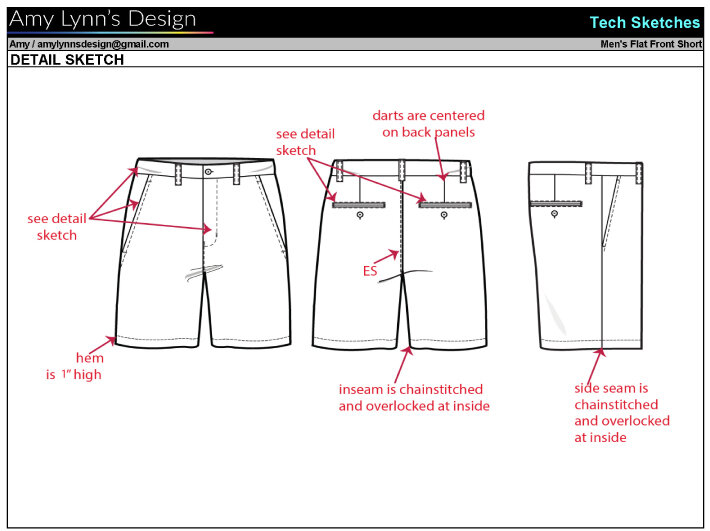
The next sketch I include is a main detail sketch. This sketch has an added layer of text over the basic flat sketch and calls out some basic info. Here I have called out the main stitching, like on the rise and side seam, as well as the hem height and dart positioning.
Everything else is called out in separate sketches where the details are blown up and easier to see (these are all the “see detail sketch” callouts).
More detail sketches
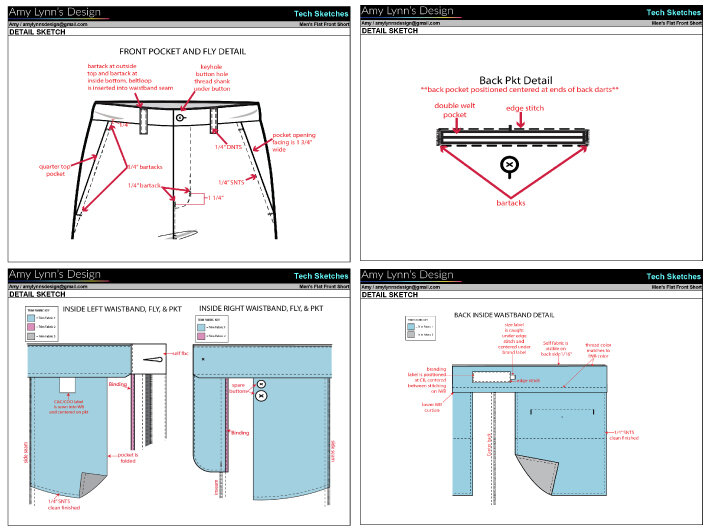
The rest of the detail sketches call out all the specifics of your style. Things like:
Stitch type (is it a single needle stitch on the edge of the seam? 1/4” from the seam? 1/8” from the seam?)
Bartacks to show where reinforcement is needed to prevent ripping
Back pocket placement
Pocket style
Pocketing fabric key (this style has printed and solid color pocketing)
Main label placement
Binding, how the fly is finished at the inside
Button attachment (this style has a thread shank attachment for security and ease of use)
How the beltloops are attached (in this case they’re inserted into the waistband seam)
Before you start thinking this is too much information…
I know this is a lot of sketches.
I know you may have already sent a competitor sample to your factory and they may have sent you a back sketch that’s much more basic.
But if you want your design to come back exactly how you want and for it to stay consistent from order to order, you really do need all these sketches.
I didn’t always include this level of detail in my sketches. I would have the basic front and back sketch and some detail sketches only if we were doing something tricky.
Then one season a short that had been running for a year started to come in with a different type of stitching on the waistband.
It had changed from an edge stitch to being almost 1/4” from the top of the waistband. It was definitely noticeable.
We hadn’t switched factories.
We hadn’t changed anything about the tech pack.
For some reason the factory just changed the stitching.
It wasn’t the end of the world, it’s not like they left the button off, but having the same short sewn two different ways hanging together on the rack doesn’t look good.
It looks inexpensive, like something you might find in an outlet mall.
Which is fine if you’re designing for outlet, but that wasn’t what we were doing.
So we started putting more detail sketches in our tech packs, and it fixed the problem.
We added detail sketches like you see above to the tech pack, and that sort of thing stopped happening.
The factory had all the information they needed and there was nothing they needed to guess, which meant fewer surprises for us.
Are you sold on why these sketches are so important?
Ok, I hope I’ve convinced you that these sketches will make your product better and your life easier.
Including detailed sketches in your tech pack makes sure your style will come in how you want, and that it will be the same the next time you (or your customer) order it.
Next week we’ll go over the last two pages in a tech pack, the measurement page and proto review page.
In the meantime, check out the link below to grab the tech pack with these flat sketches in it so you can have a look up close.
Want to see the sketches included here close up?
Get the tech pack* with the flat sketches you see here for free!
*I never share client work. This is a personal project.
Feeling overwhelmed?
Know you need a more detailed tech pack for your design but not sure where to start? I love building tech packs. Let me help! Learn more about how the technical design package can make your life easier by clicking the button below.
Questions?
Check out the services page to learn more.
Want more help?
Schedule a 30 minute call to discuss your next project.