
Part 5: What’s in a tech pack and why
Prototype review page (are you making these 3 common mistakes?)
This is the fifth and final blog in our series on tech packs. Over the last two weeks we talked about the cover page, sampling page and BOM, flat sketches, and measurements.
This week we’re talking about the prototype review page.
This is such an important page and it’s another one that doesn’t get talked about much.
I get asked all the time for the best way to track clothing prototype comments and approvals.
Here’s what brands tell me about this process:
“it’s a nightmare”
“it’s messy and not scalable”
“I can’t remember what I approved and I don’t know how to track it”
The simple answer to these problems? Track your prototype review comments in your tech pack.
In today’s post I’ll walk you through a sample prototype review page and what goes into it.
We’ll also talk about the three most common mistakes I see menswear startups making when they review their prototypes.
At the end, you can grab my free tech pack template with prototype review page to help you easily track your comments and keep your product high quality.
So what goes into a prototype review page?
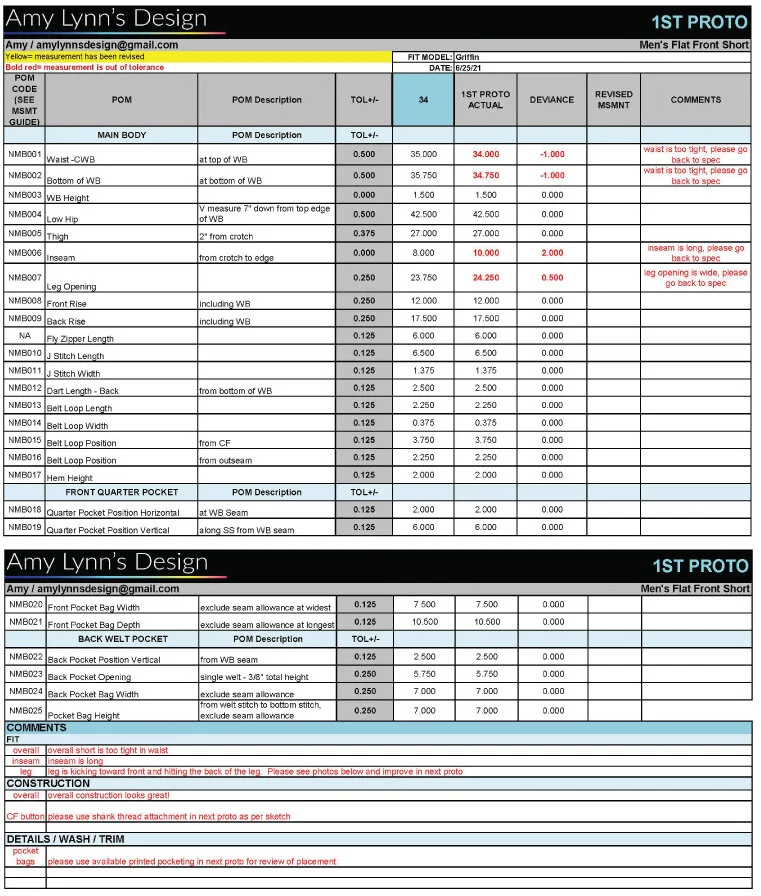
Prototype measurements, fit, construction and detail comments
Prototype measurements (1st proto actual): This is where you measure your prototype (using the point of measure guide we talked about last week) and compare it to what you asked for. This is the best way to track this information and it lets you and your manufacturer see at a glance how the measurements came in.
Measurement comments: After you fit the garment, use this column to comment on each measurement point that came in too big or too small (called “off spec”). You can let your clothing manufacturer know where you’d like them to fix something, or if you want to change a measurement that you’d originally asked for.
Fit comments: The first few bottom rows on this page are where you can let your manufacturer know more specifically how the clothing fit. Was it too small? Was the inseam too long? Was it perfect? Let the manufacturer know what you did and didn’t like about the fit here.
Construction comments: How’s the quality of the prototype, and does it match the sketches you gave the manufacturer? In the construction comments section you can let the manufacturer know if the construction looks good, or if there are areas they need to improve.
Detail comments: In this last comment section you can let your manufacturer know how you like the details, wash, and trims (buttons, zippers, etc.) they used and if you’d like them to do anything different next time.
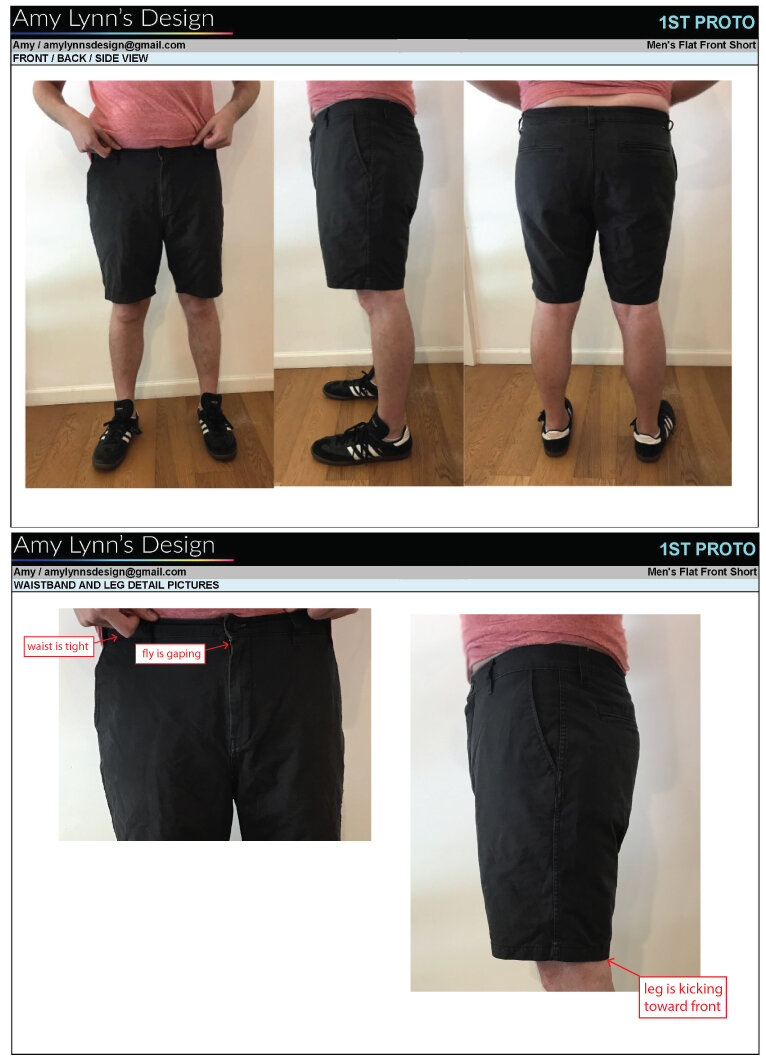
Prototype pictures
The last section of the review page is for pictures of the prototype. Always include a front, back, and side view image, as well as detail images of any problem areas.
These images:
Let your manufacturer see how the garment looked on your fit model and identify problem areas.
Give you a visual record of what the prototype looked like and how it fit.
Make it easy to look back on your last proto when you get the next one in so you can see what improved and what didn’t.
Are you making these three common mistakes?
Here are the three most common mistakes I see menswear startups making:
Not measuring the prototype
It’s really common to get your first prototype in, try it on, and give the manufacturer comments without having measured it.
But if you don’t know if the manufacturer followed the measurement set (or competitor sample) you gave them, you can’t make smart comments.
If your short came in too tight in the waist, but you don’t know how how it measures compared to what you asked for, it’s a lot harder to guide the manufacturer back in the right direction.
Did the manufacturer make a mistake? Or is your measurement set too small? If you’re not measuring the prototype, you’re just guessing.
Sometimes the manufacturer doesn’t follow your measurement set or competitor sample. Sometimes they overlook it and just use measurement’s they’ve already done before.
Not measuring the prototype means you don’t know that this is what happened.
I’ve seen brands lose months and multiple protos trying to fix a fit issue, when all they really needed to do is tell the manufacturer to “go back to spec” and follow their measurement set or competitor sample.
Not comparing to the last prototype
When you get a second prototype in, your life will be a lot easier if you compare it to the notes and images from your first prototype.
You want to make sure the manufacturer made all the changes you asked for, and that the fit is heading in the right direction compared to the last proto.
You’re managing a lot, and it’s hard to remember what happened last time.
If you made the inseam of your short longer on your first prototype, but the inseam on your second prototype seems too long, go back and check the photos from your first prototype and compare. Did you make the inseam just a little too long? Or do you like the inseam on the first prototype after all?
Maybe the fit on your quarter zip seems a little boxy on your second prototype, but the measurements all came in ok. How did the first proto look? Was it boxy, too? Or maybe your fit model was wearing was thicker undershirt when they tried on the first prototype and it changed the way the fit looked.
Maybe the factory just overlooked some of your comments.
Missing this step can be the difference between spending hours trying to fix a fit or construction problem that you already commented on, or being able to quickly say “go back to last prototype and follow comments.”
Sending prototype comments in email
Once you’ve gone through the hard work of reviewing your proto, don’t make the mistake of sending your comments to your manufacturer in the body of an email.
Using a tech pack to track your comments means you’ll never have to dig through emails (or try to remember what you said on the phone) to see what you said or approved.
It also makes it much easier for your manufacturer to see and understand what changes you want them to make. This especially true if you’re working with overseas vendors where English may be a second language.
Was this helpful?
Sign up to receive weekly blog updates, helpful design and development tips, and exciting product updates right to your inbox.
Feeling overwhelmed?
Know you need a more detailed tech pack for your design but not sure where to start? I love building tech packs. Let me help!
Schedule a 30 minute call to discuss your next project. The call is free and there’s no obligation to work together.
Want to learn more?
Read about how the technical design package can make your life easier by clicking the button below.
Want to see an example of a tech pack?
Get the tech pack* featured in this blog series for free!
*I never share client work. This is a personal project.